Taryn's Unique Learning Email Facebook Instagram Pinterest Bloglovin TPT Store Home About Me TPT Shop Freebies Contact


Monday, June 26, 2023

10 Fun and Engaging Activities to Practice Letter Identification and Sounds

Teaching letters is a big task in the primary classroom. This process often starts as early as the preschool years and continues on through kindergarten and first grade to ensure that children have a solid understanding. Since this is something you'll likely be spending a lot of time on, why not make it extra fun? Today I'm doing exactly that! Come along as I share 10 fun ways to engage your students while practicing letter identification and sounds. 

Getting your students excited about practicing letter identification and sounds is fun and easy with these engaging activities they are sure to love.

1. Find It Jars 

Everyone likes to play "I Spy," right? This first activity is focused on finding letters and identifying them with a letter sorting mat and Find it Jars. As a warm-up activity, I like to start with the letter sorting mats. Provide students with letter beads, and allow them to sort them out onto their mats, putting each bead in the correct spot. This activity also helps focus specifically on the letters in their name. There's a spot on the mat where kiddos can collect extra letters that are in their own name as they sort. 

Letter beads like these are a great way to get some hands on fine motor skills practice while your students are learning to identify letter names and sounds.
After this, take this letter identification activity up a notch and have students use "Find It Jars" to practice recognizing letters. The jars are filled with a mix of rainbow sprinkles and tiny letter beads. Children will draw a card, identify the letter on the card, and then turn the jar over to find that bead. This activity is great for small groups and centers. You can pre-make the jars and have children take turns with them, or make this into a craft activity and allow each child to make their own jar. 

This is also a fun activity to use as a whole group game. Have your kiddos gather in a circle, and choose 1 child to start with the jar. Draw a card, hold it up, and have the child identify it and find that letter in the jar. After they have finished, they pass the jar on to the person sitting next to them and repeat the process. This activity is anything but ordinary and will help get your kids excited about letter identification! 

2. Magnetic Letters 

Next up, let's talk about good ol' magnet letters. If you teach young students, you likely already know these are a classroom must-have! There are so many fun things you can do with magnet letters. Plus, they make a perfect "instant" center activity. Some of the ways we used them over the years include:

These easy to find magnetic letters can be used to spell words, identify letters, and much more.
  • Spelling names of friends - To do this activity, pair up students and provide them with a tub of magnet letters and some cookie sheets. Have kiddos take turns choosing a friend and spelling their name out on the cookie sheet with the magnet letters. Having all student names listed somewhere for this activity or written on the board is helpful. 
  • Beginning sound game - This one is great for small groups. To play, name something in the classroom, such as "desk," "light," or "pencil." Students will quickly find the letter that goes with that beginning sound and lay it in front of them. Repeat, or have students take turns calling out an item. 
  • Sensory bin - This is always a student favorite! To play this game, toss some magnet letters into a sensory bin filled with rice or dried beans. Provide students with magnet wands like these and have them "fish" for letters. When a letter sticks to their wand, they remove it and say the name of the letter and the sound.

These are just a few of the fun ways to use magnet letters for learning letter sounds and identification. Make sure to keep these on hand for quick and easy center games your students will love.

3. Hole Punch Letter Identification 


Young students work best when given many opportunities for hands-on learning. I loved incorporating fun manipulatives and other classroom tools in our lessons as often as I could to help keep kiddos engaged and excited about learning! One of my favorites for targeting both letter identification and letter sounds are these Hole Punch Mats. 

A simple hole punch turns this letter identification activity into a fun one your students can work on individually or in centers.
This fun activity has students draw a card, name the letter on the card and then find it on their mat. Then, they use the hole punch to mark it on their mat. There are card options for uppercase letters, lowercase letters, and picture cards to allow for differentiation. You use this game multiple times by having students match their cards in a variety of ways, such as:
  • Uppercase to Uppercase
  • Lowercase to Lowercase
  • Cross Case
  • Beginning Sound
  • Letters in Sequence
  • Letters Out of Sequence

This activity is great for little learners that are working on hand-eye coordination and fine motor skills too! Manipulating the hole punch is such a great way to strengthen those hand muscles and lock in student focus. 

4. Rubber-Band Geo Boards

These are another must-have, in my opinion, for a simple center option that everyone loves. 

Put your class set of geo boards to use during literacy time and have students practice identifying letters as they make them with rubber bands.
Geoboards are great for working on fine motor skills while practicing letter identification. My favorite way to use these is in small groups. 

I give every kiddo a board and some rubber bands. Then I'll say something like, "I'm thinking of a letter that makes the /s/ sound." 

The children call out the letter and then use the rubberbands to make it on the board. 

You can also say things like, "Make the letter that the word 'dog' begins with."

Either option is a fun way to get the wheels turning in those little minds in a fun way!  


5. Letter Poems 

Do you have auditory learners in your classroom? We all know that every child is unique, and different teaching methods work better for some than others. Because of this, I always loved to have a variety of activities that support visual learners, hands-on learners, and auditory learners. One of my favorite ways to master letter identification through auditory lessons is with letter poems. 
Letter poems like these help students remember letter names and sounds.

Young students are often pretty excited about songs, poems, chants, and rhymes. Use this to your advantage to help them remember their letters! These catchy letter poems help prompt children on what capital letters look like and how to write them. 

Once you introduce these to your students, they'll be repeating these poems to themselves as they write their letters. "Slant to the left and to the right...hooray! A line in between, and you write the letter A!"

These letter poems come in 2 sizes. The larger version is perfect to display as anchor chart posters around the room or laminate and bind them together as a book. The smaller version is great to give out to students as a reminder for each letter. 

6. Letter Identification Sensory Bins 

Do you use sensory bins in your classroom? If not, you're missing out on a valuable opportunity to master letter identification in a fun way! Sensory bins get a bad rap for being large and making a mess, but when done right, they're such a great way to mix things up in the classroom. 

I liked to use a small bin or wash tub to create a portable sensory bucket that can be used all year long. You can fill the bin with anything you'd like, but keep in mind how you'll want the kiddos to use it. If you plan to make this an unsupervised center activity, go for something low-mess like shredded paper or Easter grass. Make it festive by swapping out the paper shreds to match the current season or upcoming holiday. 

Letter sensory bins like these are perfect for all sorts of fun activities like letter searches and center activities.
Dried beans, dried rice, popcorn kernels, or Styrofoam peanuts are all great options too! If you go this route, I recommend putting a tray under your sensory bin to easily catch spills. Always be sure to have a brief rundown of the rules before letting kiddos use the new sensory bin too! 

Once you've got your bin all set up, add letter cards like these. This resource includes card options to target uppercase letters, lowercase letters, and beginning sounds. 

You can choose what works best for your students or differentiate to meet varied needs. To use this activity, kiddos will choose a card from the sensory bin and say it aloud. Next, they find it on their recording sheet and trace the letter. 

This resource also includes spinners to add another layer of fun. To incorporate these, students will spin, identify the letter they land on, and then find it in their sensory bin. This activity is perfect for center time and will be something students look forward to participating in. 

7. Sand Trays 

Sand trays are one of my favorite activities for practicing letter identification and formation. 

Sand trays are a great kinesthetic way for students to practice identifying letter names and sounds.
To make these for your students, grab some simple plastic trays and colored sand. For this activity, I liked to provide students with a tray filled with sand and a stack of letter flashcards. 

Students will draw a card, say the name of the letter, and then write it in the sand using their fingers. 

You can also use cards with beginning sounds as well if you'd like to target that skill. 

Once children have used this activity a few times, it makes a great center activity. It's also a fun option to use in small group interventions instead of pencils and paper. 

8. Pop It Letter Activities 

Pop-Its are a sensory toy that makes practicing letter identification and letter sounds more fun for children. Grab a Pop-It Fidget Toy with the alphabet on it, and use it alongside these activities for instant engagement. To play, students will choose a card and complete the task. There is a variety of different games included to work on different skills:

Pop It letter activities like these make practicing letter identification and sounds feel more like a game than learning.
  • Match capital letters to the capital letters on the Pop-It Toy.
  • Match lowercase letters to the lowercase letters on the Pop-It Toy. 
  • Match beginning sounds to the corresponding letters on the Pop-It Toy.
  • Find the Missing Letter in a sequence of 3. 
This activity is perfect for centers, independent learning stations, and fast finishers. Children will have so much fun "popping the bubbles" on the fidget toy. They won't even realize how much they are working on letter identification and letter sounds!

9. Wooden Letter Beads

This activity is one that you can easily make and can be used in a variety of ways. 

Use wooden letter beads like these to ask students to spell out words and identify several different letter names and sounds in a hands on way they will love.
First off, grab some plain wooden beads like these and use a permanent marker to write letters of the alphabet on them.

These letter beads are another fun variation as well. I liked to have a set with uppercase letters and one with lowercase letters to differentiate this activity among my group. 

To use this activity, have students string letter beads in ABC order on a piece of lacing cord. 

After they have the whole alphabet, they can write the letters on a piece of paper to extend the activity further. 

This is a great center activity or independent learning station that encourages hands-on learning. 

Alternatively, you can also have students work on spelling words and naming each letter as they go. For this option, have them sit near a word wall or provide them with a stack of flashcards. 

10. Letter Fluency Game

Last but certainly not least, I have one more fun activity for you to try! This letter fluency game is focused on quickly identifying and naming letters to promote overall fluency. This game is also a low-prep, print-and-play option to help save you time when preparing your literacy activities. 
Help your students learn letter identification and sounds in a game like way with a partner or small group.

To play, students will spin the spinner and then find that picture on their card. Then, they point to each letter and say it aloud, moving from left to right. You can also have students say the letter name and the letter sound before moving to the next one if you'd like to focus on both skills during this activity. 

I always loved to use this game during small groups and intervention lessons. It's also a fun pattern game too! Simply have kiddos take turns spinning until all of the letter boxes have been read aloud. 

BONUS Activity: Name Spinners!

I know I said there would be ten activities in this post, but I have one more bonus activity that I know your students will love! Aside from helping your students with letter recognition and sounds, these Name Spinners will help target the letters specifically in their names.  Starting with letters that the student has a connection to is the perfect place to begin teaching letter identification and sounds.

This resource comes with editable pages that allow you to easily add student names. Simply type in each student's name and the individual letters and spinners will automatically be generated for each child. Once the spinners are ready, add a spinner or use a pencil and paper clip to spin for letters. Children will say the letter they land on, as well as the sound it makes in their name.   Check out this video to see just how quick and easy they are to create and use.


This simple activity is a great way to get plenty of practice with the meaningful letters to each child- the letters in their own name! Use this activity during intervention groups, morning work, as a warm-up activity, or send them home to be used with parents. No matter how you choose to use them, they're sure to be a hit! 

Even More Letter Games 

Hopefully, you found something inspiring here to try. The big takeaway when it comes to learning letter identification and letter sounds is to think outside of the box! Fun tools and manipulatives like beads, magnetic letters, sensory bins, and spinners help make any letter identification game more fun and engaging for students. Using a variety of these items helps to keep a task that you work on frequently feeling fresh and exciting every time!

If you're looking for more ways to level up your letter games, be sure to check out all of the fun and engaging letter resources in my shop. You'll find games, sensory bins, task cards, riddles, and more to help your students master letter identification and letter sounds in a fun way! 

Save This Post 

This post is filled with tons of great tips to encourage letter identification in a fun way. Pin this post on Pinterest so you can come back to it when you need inspiration! 

Use these letter fluency and letter identification activities in your classroom this year for exciting literacy activities they will love. From magnetic letters to sensory bins, these activities will keep your students excited about learning letter names and sounds with hands on engaging activities you can do in centers, as independent practice, or even as a whole group activity. #tarynsuniquelearning #letteridentification #lettersounds #practicingletteridentificationandsounds

Thursday, June 8, 2023

6 Ways to Make Staff Meetings Lively and Engaging

As an administrator, you know that teaching and working in a school is more difficult now than ever. Staff morale plays a huge role in a healthy, thriving school. What's an administrator to do? Focus on those staff meetings! Engaging and lively staff meetings are one of the best ways to focus on boosting staff morale. If you're an administrator looking for ways to make your meetings more fun, I've got tons of great resources for you. 

Need help making the most of your staff meetings this year? Here are 6 ways to make staff meetings lively and engaging that everyone will love!

Today we're talking all about how to help your teachers and staff actually look forward to faculty meetings, rather than dread them. Let's dive into some fresh ideas to boost staff morale and help your entire staff feel appreciated! Everyone from the office staff to classroom teachers, and counselors to custodial staff will all benefit from the activities and ideas.  

First Up, Get to Know Your Team  

Every school is different. As an administrator, creating a positive and engaged working environment is a big part of the job.  It's important to tune into what makes our team unique, and how you can best support them. To do that, you must get to know them.  
Getting to know your team is a very important step if you want to make the most out of your staff meetings this year.
  • What's your teacher demographic? Mostly newbies, veteran teachers, or a mix of both?
  • What are their pain points in the classroom? This likely varies by grade.  Don't assume - ask them. This will show that you are interested in helping.
  • How are teachers and other staff members being treated by parents?
  • Do they feel supported? Why or why not?
  • What are their personality types? 
  • Do they know YOU? 

The key is to make sure you're well-educated on your faculty, gain their trust, and ensure they feel supported! Not sure how to do that? No problem, these 6 activities will help you learn more about your staff and help them feel supported all year long.

1. Staff Meeting Icebreakers 

The beginning of the year is hectic for everyone in the school system. This time of year marks when new teachers might be entering your school and this is an important time to make sure they feel welcomed and supported in their teaching journey. 

Ice breakers like these are the perfect way to make your staff meetings lively and engaging and will help both veteran and newbie teachers get to know one another.
This can be a "make or break" moment. After all, if a new teacher or staff member doesn't feel welcomed into their new community it can be hard to persevere through the struggles of that first year!

With all of this in mind, we also know that staff meetings are packed with TONS of things to cover. 

You're short on time, and while you want to ensure everyone is acquainted, you've also got a fair bit of ground to cover too! 

This is where simple Staff Meeting Icebreakers will save the day. These fun get-to-know-you sheets aim to have staff get another person's signature on each square. The squares list things like:

  • Pinterest-worthy classroom
  • taught 20+ years
  • literacy guru
  • long commute to work 
The idea behind these fun icebreaker sheets is that your staff will be presented with an opportunity to learn a bit more about their peers during meetings. They will discover commonalities, get to laugh and converse about some of the funny topics, and make newbies feel welcome! 

There are 4 different options, so you can use a variety of these sheets for a large group of staff, or repeat this activity once a quarter. This quick and easy icebreaker is always a hit, and easy to implement. Plus, it's a wonderful way for YOU to learn more about your staff too! 

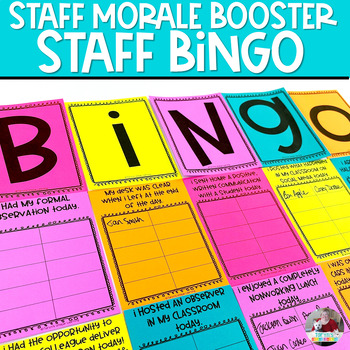
2. Staff Morale BINGO 

Next up, who doesn't love BINGO? This simple game is a fun option that can be used all year long to keep your staff meetings feeling a bit more lively. The object of these Staff Morale BINGO cards is to mark as many boxes off with an X (or a digital sticker on a PDF) during the meeting. Since these can be printed or sent out digitally via email, they're great for Zoom meetings too! The boxes are filled with fun topics like:

Use a staff meeting BINGO game like this to keep your teachers engaged during staff meetings this year.
  • I enjoyed my favorite beverage during the meeting. 
  • I received a compliment from our principal. 
  • I sat with my teaching BFF. 
  • I brought a shareable treat to the meeting.  

These simple boxes are easy to follow along with during the meeting and add a touch of fun to what might feel like an ordinary (and sometimes monotonous) monthly task. The boards also feature seasonal decor on the game boards as well because we all know how much teachers love a good theme, right? 

After the meeting, staff members can turn in their game boards and be rewarded with some kind of prize. That piece is up to you, it doesn't need to be fancy! Just a small token of appreciation is often all it takes to boost staff morale and encourage your teachers. 

3. Four Corners Staff Meeting Game 

Next up, let's talk about Four Corners - Staff Morale Edition. Four Corners is such a great way to infuse a little bit of fun in your monthly staff meetings without taking up a lot of time. 

A four corners activity like this is perfect for staff meetings because it won't take up a lot of time to run and is fun for everyone.
There are 20 different questions included along with 4 corner signs to hang in the room. This game helps get your staff up and moving, mingling, and getting to know each other a bit better. 

To play, read or hold up a question and answer choice. Next, staff will mix and mingle while moving to the corresponding corner to answer the question correctly. 

The format of this game makes it easy to customize based on the amount of time you have to spare. If you have limited time, choose just a couple of question cards. If you have more time, use more.

This is a great starter activity for your staff meeting to get everyone started off on the right foot and set the tone for a fun meeting! It's also great as a mid-way movement break.  Students aren't the only ones that need brain breaks!

4. Staff Morale Photo Hunt 

This next activity is really fun, and a bit unexpected from what you tend to see at your typical staff meeting. To play this Staff Morale Photo Hunt game, participants will search their phones for specific scavenger hunt items from a list. There are 3 categories for this game - school life, my work family, and work-life balance. Some of the fun things to hunt for include:

Everyone has a smartphone these days so put it to good use with a fun staff morale photo activity during your staff meetings.
  • an organization hack (teacher life)
  • a student beaming with pride (my work family)
  • a self-care photo (work-life balance)
  • plus MANY more

There are a total of 45 questions across 3 categories and recording sheets for teachers to write down their answers. This is another game that can be modified to meet the time allotment that you have. Simply decide prior how many questions you'll ask, and how much time you'll allow teachers to search.

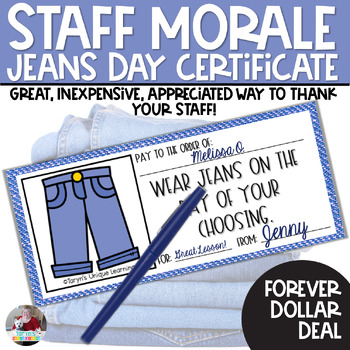
After the game is finished, have staff members turn them in and award a prize to the winners. The prize can be inexpensive (or free) too - "Jeans Day" is always a hit!  

5. Gratitude Roses for Staff Morale

Focusing on gratitude and appreciation for others is so helpful in boosting staff morale. 

Use this gratitude rose activity not only during staff meetings but also throughout the year as a special way to show appreciation to your teachers and co-workers.
The idea for these Gratitude Roses came from some of my previous administrators who had a real knack for keeping the staff feeling appreciated and motivated. My past two principals began each staff meeting armed with a vase full of fresh-cut roses. 

During our meeting, anyone in the building could thank a colleague for something that they did well or in recognition for something kind. 

For example, if another staff member walked your kids in from recess, handled emergency sub plans, covered your class, or helped unjam the copy machine, you could thank them with a rose. The idea is the same here, except these roses come in the form of notes! 

Simply pass these out, or make them available for your staff to grab at the beginning of the meeting. They fill out the page with a note of gratitude and pass it along to the deserving staff member. These can be used all year long during staff meetings, or placed in a central location to grab at any time. Encouraging kindness and gratitude is always a great practice for boosting staff morale! 

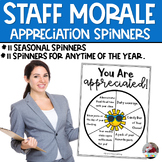
6. Appreciation Spinners for Staff Meetings 

One of my favorite ways to ensure that staff feels appreciated is through small tokens of kindness. As a special way to thank your staff for their dedication and hard work, try these Staff Morale Prize Spinners at your next meeting. 
Use staff morale prize spinners like these for extra special fun during your staff meetings throughout the year.

These spinners use fun, seasonal themes, so you can choose a different one for each monthly meeting. Teachers will spin and receive the prize they landed on. Many of the prices are free or very inexpensive which makes this feasible to facilitate. Some of the fun prizes included on the spinners are:

  • jeans/comfy clothes day 
  • prime parking 
  • having pencils sharpened weekly 
  • having a bulletin board changed out 
  • having duty covered 
  • a candy stash
  • a pack of favorite pens

When I created this resource, I surveyed teachers to see what they would value most as a prize and many of them said to get more of their time back. You'll notice that many of the prizes on these spinners do just that! These are great to use as a final activity to close out your staff meeting. 

Keeping Staff Morale Up All Year Long 

Overall, the key to maintaining healthy staff morale is to form meaningful relationships with your team! Taking the time to implement icebreakers, games, and activities focused on building trust, be intentional about showing appreciation, and making room for socializing makes a world of difference. You want to make sure your staff feels heard, valued, and supported. After all, working in education is NOT for the faint of heart in this day and age! 

My best advice for making sure your staff morale stays high is to keep those meetings fun, and lively month after month. We all have a lot going on, but putting some time into this helps ensure a happy team of teachers. If you want to boost morale all year long, be sure to check out the Staff Morale Activity Bundle.

Grab this Staff Meetings Bundle to make your staff meetings lively and engaging this year!
Included, you'll find all 6 of the fun activities and games mentioned in this post so you can keep the fun rolling in at your staff meetings all year long! With the bundle, you'll be able to...

  • get meetings started off on the right foot every time
  • turn boring meetings into engaging opportunities for community building
  • encourage teamwork and random acts of kindness among your staff
  • recognize staff for a job well done
  • help staff members get to know each other (and you) better 
  • gain teacher trust
  • show your appreciation 

There's really no downside to organizing lively and engaging staff meetings, so make sure to check out the Staff Morale Bundle if you need some no-brainer ways to boost morale among your crew!

Boost Staff Morale All Year Long

Looking for an easy way to keep staff feeling appreciated all year long? My Staff Morale Ultimate Bundle takes the guesswork out of planning meaningful activities for your team. With ideas for every season, holiday, staff meeting, and special occasion, you'll always have something ready to boost morale and strengthen your school community. Best of all, this is a growing bundle, which means you'll receive every future Staff Morale resource I add at no extra cost. The earlier you purchase, the more you save and the more resources you'll receive over time.


Save This Post 

Don't forget to pin this post on Pinterest to keep these staff meeting ideas handy! 

Staff meetings don't have to be boring and tiresome with these 6 fun activities everyone in your staff meeting will love! From fun ice breakers to get to know you activities, to BINGO to prize wheels, your staff meetings will be the stuff of legend this year. Be sure to grab the Staff Meetings Activity Bundle for fun activities you can use in your staff meetings all year long! #tarynsuniquelearning #staffmeetings #successfulstaffmeetings #funstaffmeetings #staffmeetingiddeas


Thursday, February 3, 2022

Mass Teaching Casualty of the Pandemic

Your smile is your logo, your personality is your business card, how you leave others feeling after an experience with you becomes your trademark.  

-Jay Danzie


Greetings Friends:

This is my first official blog post in ages and the first one since officially retiring from my 33 year teaching career in March, 2021.  Having spent many years as a reading intervention teacher, the onset of the pandemic set into motion a chain of events and I was faced with teaching second grade (for the first time) in a remote setting (by my request). My district was scrambling on how to meet the needs of their students and staff but there was much radio silence throughout the summer. In July of 2021, I sent a proposal to my district HR department outlining how I could be a Reading Intervention Teacher, manage the needs of my building's intervention caseload from home, and then all that was left was to determine how to do this technology wise. But they had other plans for me and truly gave me no choice regarding how I would be spending the last year of my teaching career.

While initially I wanted to dig in my heals resisting this position, I tried to look at this as an opportunity and a full circle moment, knowing full well that I was retiring at the end of the year. I did not know the full curriculum (ELA, Math, Science, Social Studies, etc.) and as a 54 year old, teaching from my basement, I definitely had technology challenges that were huge hurdles for me. Google Meeting, Google Classroom, Flipgrid, Sign Up Genius, Document Cameras, Double Screens, sharing my screen...let alone, how do you engage young students for a full day of instruction when you can not stand beside them, put your hand on their back to encourage them, and trust me when I say the eyes on the back of my head do not work as well via the computer waves! This was certainly a huge undertaking and I wasn't quite sure the effort I was going to have to put forth was worth it for this one last year! 

Fast forward to October...I received a message that our head of HR wanted to meet with me. We met and it was determined that Intervention services were needed for the remote learners.  I was told that since this was in my "wheel house" they would like me to ponder moving back to an intervention position. (Yup...I was offered the very position I requested in July!) Here's the problem...I had fallen in love with my second graders and did not want to make that move at that time.  I had successfully built a community of online learners, I had jumped over hurdles that I did not think I could clear, and although I knew there would be many more hurdles to jump over, I felt I had been through the worst of it and didn't want to be faced with those challenges in my "old but new" position. As a 32+ year veteran in those 6-8 weeks, I had learned a ton of new things, was oddly rejuvenated by my new knowledge, connected with colleagues I hadn't previously worked with closely due to the new position, and found fun, creative, and new ways to teach my second graders and was really proud of myself. Here's the kicker...when I tried to decline the position, I was told that I HAD NO CHOICE AND HAD TO SWITCH POSITIONS.  

However, I did have a choice at that time. With all of this stress, I decided to take a medical leave in order to reach 120 days...the amount of days required by the state of Ohio to count as a year of service towards retirement. From early October-February 28th, I was on sick leave with my retirement date official on March 1st!

Now it is February of 2022.  I am on the other side of this, have gained some perspective, still miss being around "my kids" and coworkers too, and I am in constant awe of the fact that you, my colleagues, are still engaged with your students during this pandemic and it is SO HARD...SO DARN HARD! Some days I feel like I deserted my team on the battlefields, but on all days I am grateful enough to have the opportunity for this new chapter of being a full time Teacherpreneur who gets to create curriculum and materials to help my friends who are still in the battlefields. I can take the day off if I want, a snow day does not have nearly the appeal it once did, I can have as many bathroom breaks as I want, and any day can be a Jeans Day!

 I look forward to seeing this new chapter take shape and see what it holds for me in my "new normal". I hope you stop by and check out some of the great products I have added to my TPT store, with you...my friends and colleagues in mind! Stay the course and please know that you are making a difference, everyday!


Sunday, September 22, 2019

A Staff Lounge Makeover Teachers Will Love!

Is your school in need of a staff lounge makeover? I remember that feeling! Back when I was the leader of the Sunshine Committee, I was charged with this task. If you're feeling overwhelmed or not sure where to start, don't fret - this is going to be fun! Come along to see how you can transform your staff lounge into a cozy and inviting space where everyone will want to hang out!

This photo shows a group of teachers enjoying time in the staff lounge and says, "A Staff Lounge Makeover Teachers Will Love"

Our Staff Lounge - The Backstory 

The staff lounge in my school was just downright depressing. The furniture was over 25 years old and traveled with us to the "new building" which was actually over 15 years old, if I'm not mistaken. Staff members stopped eating lunch in there years ago. They go in to make an occasional cup of coffee, purchase something from the vending machines, or utilize the fridge. But overall, it was a dark, uninspiring space that we all just walked by several times per day. 

This image shows a "before" look at our lounge with blank walls, little seating and no pops of color!
Sound familiar? I think this reality is a common one in schools across the United States, so you're certainly not alone! After all, funding is usually tight and we're often working in old buildings with limited resources. But, here's the thing friends... having a welcoming staff lounge is kind of a big deal. Wondering why? 

The biggest, and most important reason, in my opinion, is that it builds morale and camaraderie. As the person in charge of our Sunshine Committee, I tried to inspire and motivate our staff and keep morale high, as our job as teachers is already stressful and all-encompassing enough. This is no easy task and one that I don't take lightly! So, I decided it was time for a staff lounge makeover. I approached our principal and she was all on board with this. It took a bit of trial and error to acquire the funds for new furniture and whatnot, but I have to say - it was worth the effort! 

Getting Started with a Staff Lounge Makeover 

So, once you acquire the funding, where to begin? If you're asking yourself this question - I've got your back! Step one, in our case, was the furniture. I knew that I just didn't want a room of new, industrial furniture, however. I wanted a room that was worthy of spending time in, a room that reminded us of our lives outside of the school, and a place where staff could take a break from the hectic pace of the day. This was the primary goal for the room actually, to make staff feel "at home" away from home. 

This image shows a teacher or administrator that is thinking and making plans.
So, before you embark on this adventure, I suggest doing the same. Consider what the goals for the room are, how it's lacking, and how it could function better. For example:
  • What type of seating is needed? 
  • What makes the most sense for your school's break schedules to accommodate staff?
  • Is painting the room an option?
  • Are new bulletin boards needed?
  • What about appliances like microwaves, coffee pots, and water coolers? 
  • How can you make the room feel more cozy?
  • Are you going for a particular theme or vibe in the space?

Think about these questions and write out the answers as you begin mapping out this project. Then, as you compile your answers, consider the cost allocation for each need. This will obviously vary based on your budget, but taking the time to do this before you begin purchasing items will help ensure that you don't wind up with any surprises. You can adjust where and how you spend the money based on what seems most important to you. 

An Example of Adjusting at My School


When I went through this process, our staff lounge was pretty much a blank canvas. There wasn't much of anything going on in that space! That meant I was going to need more money than just having the furniture expense covered.  In our case, I decided to use some of our Sunshine Funds to add some finishing touches beyond what the administration covered.  A little surplus of cash in the account made this possible, but soon I realized that I would need even a little more so I didn't run the account dry. I hit up our PTO president and she made a pitch for me to the PTO Board, who also decided to chip in $500.  This was agreed upon by our PTO and appreciated by not only myself but the entire staff!

The moral of the story here is you don't know until you ask. If you're running low on funds for your project, I highly recommend doing the same! Whether it is the PTO or stores in your community, you never know where will find funds or donated items. I can say wholeheartedly that giving the staff lounge a makeover and refresh had such a positive impact on staff! 

Preparing for the Project 

This image shows a bare corner of the staff lounge before it underwent a makeover.
Before we dive into the nitty gritty, let's time-travel back to our old, sad lounge. I bet you're wondering. . . what did this room look like to start? This is a valid question and why I recommend taking a before picture. This is especially helpful if you have acquired funds from multiple sources. Sharing the before pictures with them after the big reveal will help them know that their donations went to good use! 

As you can see, the icy gray-blue walls were basically a non-color. Not inspiring in the least! The entry to the room was just plain blah and there weren't even chairs in the space because no one came in to stay! There was also some light blue cabinetry that had to stay put without alteration. You'll see in the reveal how I made this work with our theme. On a positive note, there was ample space for some soft seating arrangements and major potential. 

Bringing Your Vision to Life

This photo showcases the long table, chairs and pops of color that I added during the staff lounge makeover.
After you've mapped out your plan, budgeted funds, and taken your before pictures, it's time for the fun part. Bringing the vision to life is the best part! In our space, functionality was at the top of my list. In our school, teams of teachers typically include five grade level teachers plus, at any time, there could be an intervention teacher and/or special education teacher joining the team for lunch, plus a few others. This was important for me to consider since I wanted whole teams to be able to meet here. 

I decided I wanted tables that could accommodate at least 8 people so entire teams could be together, or even merge teams who overlap on lunch times. Also, I was going for a coffee shop/cafe vibe in the room. I wanted tables of various heights, upholstered furniture that would be durable for the long run, and flexible seating for various staff preferences. I highly recommend taking some time to think about how your vision will accommodate the staff. Sometimes, this is something that unfolds as you go, but having a plan always helps! 

Where to Look for Materials, Decor, and Furniture 

I spent a lot of time going to different places to find pieces and accessories for our project. I really wanted it to feel homey, so I shopped at home stores like IKEA, At Home, The Fabric Shack, Marshalls/TJ Maxx, Walmart, and a local bookstore. Online stores like Amazon have a lot of great options too. Here are some of the things I purchased for our staff lounge makeover: 

Furniture 

This image highlights small round tables that I used as part of the staff lounge makeover
For our staff lounge, I chose two high-top rectangular tables that could fit eight adults each, two low round tables that could fit four adults, and a couch and club chair, coffee tables and end tables, a conversational area to warm up the room just perfect for a break, not necessarily just for eating. The chairs were all either royal blue or navy blue to tie in with the cabinetry. 

The upholstered pieces were only available in gray or black from the company we used so I reluctantly went for the black since I figured it would hold up better over time than a light-colored option. The coffee tables I found were very reasonable from an online store called Seventh Avenue. I wanted low-profile tables that had a lot of glass so they did not visually take up a lot of room in the corner. Definitely peek around online because there are so many great options available now! 

Accessories & Functional Pieces 

This photo shows a coffee bar that is a great addition to any teachers' lounge.
Our Ruggable Rug was one of the online best purchases! If you've never heard of them, Ruggable makes a very interesting product. The rug is more like a fabric that gets put upon a pad. The rug passed our Fire Inspector and is even machine washable. I thought this would be perfect for maintaining the cleanliness of the room and any spills that may happen due to the nature of the space. 

I purchased adorable salt and pepper shakers for each table with fun sayings on them, along with bright placemats for a pop of color. A new microwave was purchased and the old one was thrown out as it had seen better days. My favorite thing in the room was the absolutely adorable coffee station, loaded with coffee pods and teabags, cups, sweeteners, and a new Keurig Coffee Pot. This was a frequent stop for many staff members!

I added a cute tree branch coat rack so staff members who have duty after lunch can hang their coats out of the way while eating. I even put out some puzzle books like crosswords, sudoku, word searches, and jumbles, along with pens for those wanting to zone out for a few and truly take a break. 

Cozy Touches

Cozy touches like the staff photo wall in this image can warm up a staff lounge!
I added some throw pillows to camouflage the black upholstery and add some fun colorful touches. The cornice above the window to the hallway was built by my handy colleague, Darren, out of wood and I upholstered it using batting and a fabulous fabric that ties into the rug and pillow colors. If I were to do this project over again, I think I would also add some cute vinyl letters like these to complete the lounge vibe! The only thing you can't see in these pictures is the new paint on the walls, which was done afterward. I chose a buttery tan, and it really helped warm up the room! 

Last, these "frames" were from IKEA. I bought three of them then stalked my colleagues on Facebook to get pictures of family and friends to clip up here. I added additional clips for staff members to add more pictures. A touch of our homes and our hearts! This was a total hit with staff and it was completely unexpected. You could also use photos of team-building events or fun quotes in a place like this too, if you're not able to get personal photos. 

Unveiling the Results

This image shows a group of teachers enjoying the new and improved staff lounge!
Once your project is complete, find a way to make the big reveal fun and exciting for staff. You could invite everyone to stop by the new and improved staff lounge to grab a cold beverage from the fridge, or even set up some kind of snack bar to celebrate. Whatever you choose, make it fun! This is a big deal and should be celebrated with staff members!

The positive impact of our own staff lounge makeover was huge! Many more teachers and staff members began using the room to relax, eat, and convene. But most importantly, it helped to bring a little extra sunshine into the lives of my colleagues and friends. I'd call that a win-win! 

If this is a project you're preparing to work on, I hope you got some great ideas from seeing what has been done in our building! My best advice is to remember to map things out, weigh the cost, and ensure that the functional needs of the room are being met. Combine that with some personal touches and you're on your way to creating an incredible space for your school staff! 

Ready to Add Some More Staff Building Activities To Your School?

Once you've updated your staff lounge, it's time to focus on team building! Check out these posts to help you get started!


Boost Staff Morale All Year Long!

Whether you're a principal, sunshine committee member, instructional coach, or PTA volunteer, finding fresh ways to celebrate staff can be challenging. That's exactly why I created the Staff Morale Ultimate Bundle. Packed with budget-friendly ideas, printable resources, gift tags, team-building activities, and appreciation events that appeal to a variety of personalities and preferences, this bundle helps you create a positive school culture without spending hours planning. Plus, since it's a growing bundle, you'll automatically receive future additions as they're released.


Save This Post 

Be sure to pin this post on Pinterest so you can easily come back to it when you're ready to tackle this project in your school! 

Thursday, June 29, 2017

Find It....Letter Recogntion

Have you ever seen those "Find It" Games that are filled with lots of things for little people to find? I've adapted it for my emergent readers and I am absolutely IN LOVE with my latest edition.  If you teach little people, this could be a great activity to put at the top of your list when school is back in session for the Fall.  Now I am an intervention teacher and I have small groups of students usually in K and 1st Grade.  I'm not doing this with a full classroom of students so you can determine whether or not this activity would be cost prohibitive to you or not. Or perhaps you can be creative and get donations from parents or other sources in order to finance the activity. However, if you choose this is for you, then let me tell you ALL about it.

When I first started making "Find It" jars with my students, I collected baby food jars for each of my kiddos so they could take one home with them.  The positive was that I could always gather a bunch of baby food jars and they were really inexpensive...and in fact FREE.  Now I'm not a mom, but I think that perhaps baby food doesn't come in jars anymore or at least the moms in my building do not buy baby food in jars.  I have had a lot of difficulty getting my hands on the quantities that I need so this summer, I decided to go another route. I decided to see if I could purchase "jars" and while I was at it, I wanted plastic in case of those pesky falls caused by clumsy hands. This is what I came up with and I am really liking the solution.  Although they are about $1.50 each, they are so well worth it in my opinion.


In addition to the bottles/jars, you need alphabet letter beads. You can use one type or more than one type. This summer, I lucked out and found some beads at The Dollar Tree, so I wasn't shy with my purchasing there, as I've never found them so inexpensively.  I still have some leftovers from previous years, so I will use those as well. When using the letter beads, I want each student to have at a minimum, one of each letter in the alphabet.  But in edition, I have them spell out their name in beads and I include a bunch of extra letter beads that they did not know based on their initial letter screening assessment.  That way they will learn the letters that are important to them (their name letters) and the letters that are important to me (the ones they do not recognize).  If you are not able to find letter beads at your local dollar store, you can always find them at your local craft store. And just a side note....beads are usually capital letters, not lowercase, at least that's what I have found.

To fill up the jar the rest of the way so they look like an authentic "Find It" Game, you need  Ice Cream Sprinkles.  I'm from Ohio and we called them Jimmies growing up. Although perhaps Jimmies meant either the chocolate only or the rainbow only. I'm not 100% positive. Anyway, I purchased mine awhile back but they came from Gordon Food Service in 25 ounce jars.  But I have since found them online for cheaper.  And I would use what I needed and save the rest for the following year. I figure if they are expired, it's no big deal as we are not eating them right?

I also include a shiny penny in each jar.  I tell my students that is for good luck.  For whatever reason, they really like the idea.

I began using whatever alphabet strips I had in my room when students would sort through the letter beads. They were encouraged to find a bead that matched each of the 26 letters.  But I have since made a fun sorting sheet just for this activity and occasion.  I printed them on card stock and laminated them on my personal laminator, so they are extremely durable and will be good to use in years to come.  If you would like to download this SORTING SHEET FREEBIE, you are more than welcome to do so by clicking on the link below.


Once your students have found all the letters you require or suggest, you can use a funnel and start pouring in the sprinkles into the jar.  Mix in the beads so they are spread throughout the layers of sprinkles, alternating sprinkles and beads, as well as the penny.  Leave a little space at the top of the jar so the sprinkles and beads can rotate through the jar. And this is what the final product will look like. 


So good luck with your project. If you use some different materials, I'd love to hear how you adjust this activity to meet your needs.  Comment below and let me know how it goes.  

And for more great letter and sound activities, please check out the link up below so you can see what some of my favorite TPT teacher author's have up their sleeves.  

Until Next Time,